The fig is a many splendored thing, especially this time of year. Fall is the season of figs. Yes, there are pumpkins aplenty, and butternut squash to boot. Cauliflower is coming in nicely, and crisp, tart apples by the barrel. But none can compare to the fig. They are not hardy—figs spoil quicker than a minute, and once you pluck the fleshy little fruits from the tree you have to handle them just so. Figs are as fragile as a whisper, and if they are bruised or split, it’s all over but the crying. You must eat figs within a day or two of picking—this is not negotiable—and though refrigeration helps prolong their little lives, it robs the fruit of its figginess. That’s why I love them. You have to accept a fig on a fig’s terms.
There are many ways to enjoy their lushness—you can fancy-schmancy figs up like a pig in a poke, but really, simple is best. The honeyed flesh is sweet and delectable and needs little adornment in the way of additional flavors. Fresh figs are divine with salty aged cheeses and meats, pork in particular. Stuff a fig with goat cheese and a little thyme, wrap that sucker in prosciutto and bake until crispy and you’ve got yourself a mouthful of humdinger-yumfabulousness. It’s so good I just made that word up to describe it. If you’re not a fan of goat cheese, use mascarpone with honey instead, and it will still be absolutely amazing. It’s been done, I’ll grant you. But who cares? Your mouth won’t know it’s not as fashionable an amuse-bouche as it once was. If you’re worried what your foodie friends will think, roast those little figgy-boos with maple syrup and pair with brie or a nice, rich buttermilk blue cheese. Serve with crackers and candied walnuts and you’ll be ready to skip dinner.
I almost grabbed a basket of figs this weekend from a local market, but I was worried I wouldn’t be able to eat them before they decided to wilt into mush on me. Still, it is officially fall, and it’s difficult to see the season pass before my eyes when I haven’t bitten into the first fig. So when I passed by a barrel of dried figs in the same market, I had to stop. Dried figs keep forever, and I’ve been wanting to try my hand at homemade fig newtons. I figured if the cookies turned out nicely, I could add them to my list of Christmas cookies this year. I made my first batch today and the verdict is an emphatic thumbs up. Jumping Jedediah, those cookies are good! I’ve eaten five since I started writing this blog post. I almost typed three just to make myself sound like less of a glutton, but I’m just gonna turn on my heartlight and let my fig love shine. Join me friends. You won’t regret it.
Homemade Fig Newtons
1 pound dried figs, chopped, stems removed*
1/2 teaspoon orange zest
Juice of 1 orange
1/4 cup honey
1 cup water
1 cinnamon stick
1 cup butter, softened
3/4 cup brown sugar
3 egg yolks*
2 teaspoons vanilla
1 cup whole wheat flour*
1 cup all purpose flour*
1/2 teaspoon baking soda
1/2 teaspoon salt
1. Combine figs, zest, juice, honey, water and cinnamon stick in a heavy bottomed saucepan. Cook on low until figs are soft and mixture is thick, 30-45 minutes. Remove cinnamon stick and mash with a potato masher until no longer pulpy. You may need to add a little more water and continue cooking to soften. Remove from heat and cool completely before using, ideally overnight.
2. Cream butter and brown sugar in the work bowl of a mixer. Add in egg yolks and vanilla.
3. In a separate bowl, whisk together flours, baking soda and salt.
4. Add flour mixture a cup at a time to butter mixture, beating to combine. Shape dough into a disk, wrap tightly in plastic wrap and refrigerate for 2 hours to overnight.
5. Cut disk in half; place half the dough back in the refrigerator to keep it well chilled. On a well-floured surface, roll one half of the dough out to about a 1/4-inch thickness. Using a pizza cutter, trim dough into a rectangle, then divide down the middle into two rectangles. Each should be about 3 inches wide and 8-12 inches in length.
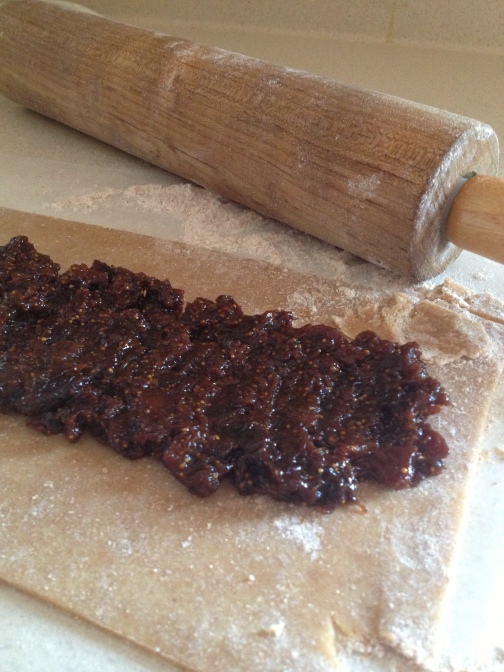
6. Handling the dough gently, place rectangles on a parchment line cookie sheet. Spoon cooled fig mixture down the middle of each rectangle; fold sides over to form a log, slightly pinching seam to close. Repeat with the remaining dough. Place cookie sheet in the refrigerator for 20 minutes.
7. Preheat oven to 325°. Remove cookies and turn seam-side down. Bake cookies 15-18 minutes, or until golden brown; cool completely, and slice with a pizza cutter. Enjoy!
* I used organic figs and organic flours, as well as natural brown sugar. Whether you do so is a personal choice, but I would highly recommend it!


